

Cart

Imagine building your tiny home with materials that have been used for centuries—materials that can withstand heat, rain, and even earthquakes. Sounds like magic, right? Well, it's actually the ancient technique of adobe construction. But how does the process of mixing traditional Mexican adobe plaster for tiny house walls work? Hold on to your trowel, because we’re about to break it down in the simplest, most fun way possible.
Before we get into the details, let’s take a moment to appreciate adobe plaster. This isn’t just any regular plaster. Traditional Mexican adobe plaster is made from natural ingredients like clay, sand, and water, with the occasional straw or animal fibers to hold everything together. It’s eco-friendly, durable, and can keep your tiny home cool in summer and warm in winter—basically, it’s the superpower of building materials.
To make the perfect adobe plaster, you need the perfect ingredients. You’ll start with clay—this is the main ingredient, so think of it as the hero of your mixture. Next, you'll add sand, which gives the plaster texture and helps it dry properly. Straw or other fibers are optional, but they help keep the plaster strong and flexible. Think of them as the secret ingredient to your plaster’s endurance. You’ll also need water to make everything stick together.
Now, the fun begins! Grab a large mixing area, and get ready to get your hands dirty. First, mix the dry ingredients: clay and sand. You want to blend them together evenly—this is key to making a smooth plaster that won’t crack easily. Once the dry ingredients are mixed well, slowly add water to the mixture. Stir it continuously until the plaster reaches the consistency of thick mud. You know you’re getting it right when it holds its shape but isn’t too runny.
Once your adobe plaster is mixed to perfection, it’s time to get to work! Take your trowel and apply the plaster to the walls of your tiny home. Start from the bottom and work your way up, applying a thick, even layer. Don’t rush—it’s not a race. The more carefully you apply it, the stronger and more beautiful your walls will be. If you’re aiming for that rustic, Mexican adobe look, don’t worry about making it super smooth. In fact, the more texture, the better!
Patience is key here. Let the plaster dry for several hours or even a day, depending on how thick the layer is. Once it’s dry, you can apply additional coats to make the walls even thicker and more durable. The more coats, the more resilient your tiny house walls will be.
Once the plaster has fully dried, you might want to seal it for extra protection. A natural sealant can help keep water from soaking into the walls and protect the plaster from wear and tear. Plus, it gives your tiny home a beautiful, finished look.
Aside from its durability and natural beauty, adobe plaster is also incredibly sustainable. You’re not just building a tiny home—you’re building one that’s eco-friendly and rooted in centuries of tradition. Plus, it’s a fun and rewarding process that connects you with an age-old building technique. So, roll up your sleeves and give it a try!

Imaginez un monde où les festivités de Noël ne se terminent pas le 25 décembre. Non, señoras y señores, ell...
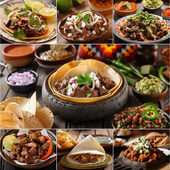
Une fête dans votre assiette : les secrets savoureux de la cuisine mexicaine Imaginez-vous entrer dans u...
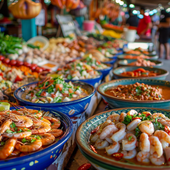
Embarquez pour une aventure culinaire : les merveilles des fruits de mer mexicains Imaginez-vous : vous ...
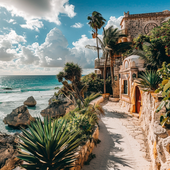
Lancez-vous dans une aventure culinaire : des plats mexicains exotiques qui raviront vos papilles Si vou...
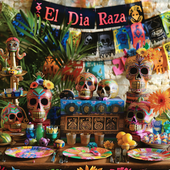
Libérez la fureur festive : des fournitures ultimes pour votre fête El Día De La Raza ! Imaginez : un ca...
Bienvenue dans le sanctuaire sacré de l'humour où nous fusionnons spiritualité et humour. Aujourd'hui, nous...
Salutations, esprits curieux et amateurs de festins ! Aujourd'hui, nous plongeons dans une tradition qui im...
« Portez la fête vers de nouveaux sommets : découvrez le monde passionnant des ensembles de bâtons de piñata et...

Une fête avec une touche musicale Rassemblez-vous, vous, les aficionados de la Fiesta, pour le cache-ore...

Le grand guacamole : révéler l'amour de la cuisine mexicaine S’il y a une chose dans ce monde qui est un...

Une fête savoureuse : découvrir les délices gastronomiques d'un buffet mexicain Vous êtes-vous déjà retrouvé ...
Ayez la caramba ! Oubliez de casser vos piñatas génériques achetées en magasin ; il est temps de plonger tê...
Donnez une touche de fantaisie à votre tenue : l'édition Tablier Pensez-y. Combien de fois avez-vous dû ...
Faites bouger les choses à l'occasion du Cinco de Mayo Dans la glorieuse symphonie des verres qui claque...

Mesdames et messieurs, garçons et filles, préparez-vous à un voyage haut en couleur au cœur de la culture m...
Bonjour amis et amies ! Êtes-vous prêts à enfiler votre sombrero et à agiter vos maracas ? Le Cinco de Mayo...

La décoration la plus douce : transformez votre maison avec l'agave Imaginez-vous en train de vous prome...
La fiesta ultime : ajoutez du rythme à vos réunions de famille avec de la musique mexicaine traditionnelle ...
L'étrange cas des cartes de remerciement pour les réunions de famille mexicaines Imaginez une journée cha...
Le grand rassemblement autour du guacamole : pimentez vos retrouvailles familiales mexicaines Imaginez-v...
Déverrouillez les saveurs du Mexique : des secrets épicés vous attendent dans chaque bon ! Bienvenue à to...
L'énigme colorée : démêler le monde des piñatas ! Imaginez un monde sans piñatas. Les fêtes d'anniversair...
Une fête de tissus et de franges : le guide indispensable pour s'habiller à la mexicaine ! Bienvenue, me...
Déballez la Fiesta : des cadeaux de fête avec une touche épicée ! Bienvenue, amis et amies, dans le guid...
Avez-vous déjà siroté une margarita directement au creux d'un verre à cactus tandis que des airs de mariach...
Une fête de flottaison : des ballons pour El Grito ! Imaginez-vous : le ciel est aussi sombre et lustré...
Sainte Taupe, quel est le Grito de Dolores ? Bonjour à tous les passionnés d'histoire et de fiesta ! Ave...
Boum ! Pétillant ! Pop ! Ah, la symphonie des feux d'artifice du Jour de l'Indépendance du Mexique, un taco...
La bataille des bulbes en fleurs : une énigme colorée Mesdames et messieurs, entrez dans le monde astucie...
Décrypter les mystères des traditions ancestrales Bienvenue à tous les curieux et amateurs de culture ! ...
Libérez votre Fiesta intérieure avec des accessoires de photomaton farfelus ! Imaginez-vous : vous êtes ...
Que la fête commence : un voyage photographique à travers les célébrations indigènes du Mexique Mesdames,...
Révélez le chef qui sommeille en vous avec des saveurs ancestrales : un avant-goût du Mexique indigène Im...
La vaste palette d'expression culturelle Imaginez-vous : vous parcourez des pages interminables d'œuvres...
Oh mon Dieu, prenez votre sombrero et un expresso, car vous aurez besoin de vos deux mains libres pour appla...
Avez-vous déjà assisté à un dîner entre amis, regardé la table et pensé : « J'aimerais bien voir davantage ...
Bien sûr ! C'est parti : Au rythme de la tradition : à la découverte du riche patrimoine musical du Mexiq...
Mesdames, messieurs et tous ceux qui aiment les fiestas, rapprochez-vous car nous sommes sur le point de dé...
À la découverte d'un trésor : le monde fantaisiste de l'artisanat indigène mexicain Prenez un instant, f...
Mesdames et messieurs, tenez vos tacos et préparez-vous à un voyage pyrotechnique que vous n'avez pas deman...
Soyons honnêtes, amis et amies : quand il s'agit de pimenter une fête, peu de choses crient « Viva Mexico !...
Quand le ciel scintille : embrasser le feu avec un rire et une boucle Avez-vous déjà assisté à une fête m...
Le charme explosif des ciels nocturnes mexicains Si les paysages enchanteurs et les délices culinaires d...
Démêler les fils du temps avec des affiches indigènes mexicaines Pourquoi les anciens hiéroglyphes égypt...
Bienvenue, chers lecteurs curieux, dans le monde fantaisiste du bien-être, où la sagesse ancienne rencontre...
Illuminez la nuit avec une étincelle Imaginez la situation : vous êtes chez vous, l'horloge sonne l'heur...
Le débat sur les feux d'artifice : pourquoi les feux d'artifice d'intérieur sont-ils si démodés ? Imagin...
Explosion d'excitation : pourquoi votre fête a besoin de feux d'artifice Imaginez la situation : vous êt...
Mesdames, messieurs et amateurs de pyrotechnie de tous âges, rassemblez-vous ! Vous en avez assez des mêmes...
Soyons honnêtes, la seule chose qui éclipse le spectacle scintillant des feux d'artifice est l'équipement d...

💖 Ressentez l'esprit de la Fiesta avec LA AGUILA 💖 Certains t-shirts ne sont que du tissu, mais celui-ci ? C'est un symbole de vot...
Afficher tous les détails
🦅 Embrassez l'esprit de liberté avec LA ÁGUILA 🦅 Certains t-shirts capturent un instant. Mais celui-ci ? C’est un hommage à l’espr...
Afficher tous les détails
💖 Déployez vos ailes avec La Águila 💖 Certains t-shirts ne sont que des motifs — mais celui-ci ? C’est votre esprit, votre culture...
Afficher tous les détails
💖 Ressentez l'esprit de la tradition, vivez le plaisir 💖 Chaque partie de Lotería rappelle des souvenirs — rires, compétition et c...
Afficher tous les détails
💖 Célébrez votre héritage avec une touche audacieuse 💖 Il y a un sentiment particulier quand on porte quelque chose qui est plus q...
Afficher tous les détails
💖 Un souvenir à chérir pour toujours 💖 Certains t-shirts ne sont que des vêtements, mais celui-ci ? C’est vous. C’est votre histoi...
Afficher tous les détails
💖 Incarnez l'Esprit de l'Aigle 💖 Ce n'est pas seulement un t-shirt. C'est votre chance de porter le symbole de la force, de la l...
Afficher tous les détails
💖 Prenez de la hauteur avec un morceau de tradition 💖 Certains t-shirts ne sont que des vêtements—mais celui-ci ? C’est votre lien...
Afficher tous les détails
💖 Ressentez l'esprit de liberté à chaque fois que vous le portez 💖 Certains t-shirts sont plus que de simples tissus—ils portent ...
Afficher tous les détails
💖 Libérez le scientifique qui est en vous 💖 On dit que la science est un monde à part entière, une aventure qui dévoile les mystèr...
Afficher tous les détails
💖 Pour l'Amour de la Science et du Style 💖 Certains t-shirts ne sont que des vêtements, mais celui-ci ? C’est une célébration de q...
Afficher tous les détails
💜 Libérez votre super-pouvoir avec style ! 💜 Certains jours, il faut simplement assumer le cynique qui sommeille en vous. Et maint...
Afficher tous les détails
💖 Affichez votre style, célébrez votre culture 💖 Certains t-shirts ne sont que des vêtements—mais celui-ci ? C’est votre histoire,...
Afficher tous les détails
💖 Votre Style, Votre Lotería 💖 Imaginez entrer dans une pièce et sentir tous les regards posés sur vous. Pas parce que vous essaye...
Afficher tous les détails
💖 Libérez l'icône qui est en vous 💖 Certains t-shirts ne sont que des vêtements, mais celui-ci ? C’est une affirmation de soi. Un ...
Afficher tous les détails
💖 Votre Cœur, Votre Histoire, Votre Fierté 💖 Certains t-shirts ne sont que des vêtements, mais celui-ci ? C'est bien plus. C’est v...
Afficher tous les détails
💖 Votre Style, Votre Histoire 💖 Chaque design a une histoire — mais celui-ci ? C’est une célébration de vous, enveloppée dans les ...
Afficher tous les détails
💖 La Magie de la Nostalgie et de la Culture Réunies 💖 Certains t-shirts ne sont que des vêtements—mais celui-ci ? C’est votre héri...
Afficher tous les détails
💖 Portez Votre Histoire, Vivez Votre Héritage 💖 Chaque design raconte une histoire, mais certains vont encore plus loin. Imaginez ...
Afficher tous les détails
💖 Votre Nouveau T-shirt Préféré 💖 Certains t-shirts ne sont que des vêtements—mais celui-ci ? C’est vous. C’est votre histoire, vo...
Afficher tous les détails
💖 Votre histoire, tissée dans chaque fil 💖 Imaginez porter un vêtement qui capture votre essence, votre héritage et votre histoir...
Afficher tous les détails
💖 Votre nouveau t-shirt préféré vous attend 💖 Avez-vous déjà trouvé un t-shirt qui semble avoir été conçu spécialement pour vous ?...
Afficher tous les détails
💖 Votre Histoire, Votre Style 💖 Certains t-shirts ne sont que des vêtements, mais celui-ci ? C'est le reflet de vous. Il raconte v...
Afficher tous les détails
💖 Votre héritage, votre histoire, votre style 💖 Certains t-shirts sont bien plus que de simples vêtements : ils sont le reflet de...
Afficher tous les détails English


Laisser un commentaire