
Warenkorb


Imagine having a delicious supply of Mexican foods always on hand, ready to spice up your meals! What if I told you that with a few simple steps, you could ferment your favorite Mexican dishes at home and store them for months, maybe even longer? Whether it's tangy salsa, crunchy pickled vegetables, or a zesty batch of homemade fermented hot sauce, fermenting Mexican foods can take your culinary skills to the next level. Let's dive into the easy steps to get you started on your journey to fermented food glory!
The first step in fermenting Mexican foods for long-term storage is selecting the right ingredients. Popular choices include tomatoes, peppers, cucumbers, carrots, and cabbage. You want fresh, high-quality produce because these will form the foundation of your fermented creations. Make sure everything is clean and free from any pesticides or harmful chemicals—it's essential for a successful fermentation process!
Once you've got your fresh produce, it's time to prep! For vegetables, wash them thoroughly, and cut them into manageable pieces. If you're making salsa, you'll want to chop your tomatoes, onions, and peppers into small, bite-sized chunks. For pickles, slice the cucumbers into rounds or spears. The key is to ensure that your ingredients are cut evenly so that they ferment uniformly. The magic happens in the details, so don’t rush this step!
Fermentation relies on a healthy balance of salt and water. In a large bowl, mix salt with water to create a brine. The salt helps to draw out moisture from the ingredients while encouraging the growth of beneficial bacteria. For a simple brine, use about 1-3 tablespoons of salt per quart of water. The salt also helps to preserve the food, so don't skip it! You can add a few flavorings, like garlic, oregano, or bay leaves, to enhance the taste of your fermented vegetables. The more flavor, the better!
Now that you've prepped your ingredients and made your brine, it's time to pack everything into jars. Place your veggies, salsa, or other ingredients tightly into clean glass jars. Fill the jar with your brine, leaving about an inch of space at the top to allow for expansion during fermentation. The less air, the better, so ensure the ingredients stay submerged in the brine. You can use a weight to keep everything down—an old jar or clean stone works wonders!
Place your jars in a cool, dark place (like a cupboard or pantry) and let the fermentation begin! Over the next few days to weeks, your Mexican foods will begin to ferment. Check them daily to make sure everything stays submerged. The beauty of fermentation is that the process is relatively low-maintenance—just be patient! Depending on the temperature, your foods could be ready in as little as 3 days or up to 2 weeks. The longer they sit, the more intense the flavor will become!
When your fermented foods reach the desired taste, it's time to taste test! If they’re just right, transfer the jars to the fridge to slow down the fermentation process. This will help preserve them for long-term storage. Your homemade fermented Mexican foods will last for months when kept chilled. Whether you’re craving tangy pickles, zesty salsa, or flavorful fermented vegetables, you’ll always have a delicious, homemade treat ready to go!
Fermenting Mexican foods at home is not just about preserving your favorite dishes; it's also about enhancing their flavors and nutritional value. Fermentation adds probiotics, which are great for gut health, and can help boost your immune system. Plus, fermenting at home lets you control the ingredients and customize the flavors to your liking! So why wait? Start fermenting today and enjoy a flavorful, long-lasting stockpile of delicious Mexican foods!

Stellen Sie sich eine Welt vor, in der die Weihnachtsfeierlichkeiten nicht am 25. Dezember enden. Nein, señ...
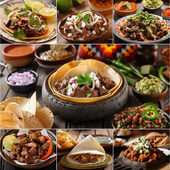
Eine Fiesta auf Ihrem Teller: Die herzhaften Geheimnisse der mexikanischen Küche Stellen Sie sich vor, S...
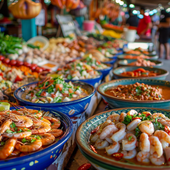
Begeben Sie sich auf ein kulinarisches Abenteuer: Die Wunder mexikanischer Meeresfrüchte Stellen Sie sic...

Begeben Sie sich auf ein kulinarisches Abenteuer: Exotische mexikanische Gerichte, die Ihren Gaumen kitzeln...

Entfesseln Sie die festliche Wut: Ultimative Vorräte für Ihre El Día De La Raza-Party! Stellen Sie sich ...
Willkommen im heiligen Schrein des Humors, wo wir Spiritualität mit einer Prise Witz verbinden. Heute tauch...

Seid gegrüßt, ihr Neugierigen und Festtagsliebhaber! Heute tauchen wir mit dem Löffel voran in eine Traditi...

„Bringen Sie Ihre Party auf ein neues Niveau: Entdecken Sie die aufregende Welt der Piñata-Stick- und Augenbind...

Eine Fiesta mit musikalischem Twist Versammelt euch, ihr Fiesta-Fans, für den seltsamsten und entzückend...

Der große Guacamole-Streich: Die Liebe zur mexikanischen Küche entdecken Wenn es etwas auf dieser Welt g...

Eine geschmackvolle Fiesta: Entdecken Sie die gastronomischen Köstlichkeiten eines mexikanischen Buffets Habe...
¡Ay, Caramba! Vergessen Sie das Zerschlagen Ihrer gewöhnlichen, im Laden gekauften Piñatas; es ist Zeit, ko...
Entfesseln Sie die Fiesta Ihrer Mode: Die Schürzen-Edition Denken Sie darüber nach. Wie oft haben Sie sc...
Bringen Sie an diesem Cinco de Mayo Schwung in die Sache In der herrlichen Symphonie klirrender Gläser u...

Meine Damen und Herren, Jungen und Mädchen, machen Sie sich bereit für eine farbenfrohe Reise ins Herz der ...
Hola amigos y amigas! Seid ihr bereit, euren Sombrero aufzusetzen und eure Maracas zu schütteln? Cinco de M...

Das süßeste Dekor: Verwandeln Sie Ihr Zuhause mit Agave Stellen Sie sich vor, Sie schlendern durch die G...
Die ultimative Fiesta: Bringen Sie mit traditioneller mexikanischer Musik Rhythmus in Ihr Familientreffen ...
Der seltsame Fall der Dankeskarten zum mexikanischen Familientreffen Stellen Sie sich einen heißen, sonni...
Das große Guacamole-Treffen: Peppen Sie Ihr mexikanisches Familientreffen auf Stellen Sie sich Folgendes...
Entdecken Sie die Aromen Mexikos: In jedem Gutschein erwarten Sie würzige Geheimnisse! Willkommen, kulina...
Das bunte Rätsel: Die Welt der Piñatas enträtseln! Stellen Sie sich eine Welt ohne Piñatas vor. Geburtsta...
Ein Fest der Stoffe und Fransen: Der unverzichtbare Leitfaden für die mexikanische Kleidung! Willkommen,...
Packen Sie die Fiesta aus: Partygeschenke mit einer pikanten Note! Willkommen, Amigos und Amigas, zum ul...
Haben Sie schon einmal eine Margarita direkt aus einem Kaktusglas getrunken, während im Hintergrund fröhlic...
Ein Schwebefest: Ballons für El Grito! Stellen Sie sich Folgendes vor: Der Himmel ist so glänzend dunke...
Heiliger Maulwurf, was ist der Grito de Dolores? Hallo, Geschichtsinteressierte und Fiesta-Fans! Wurden ...
Bumm! Zischen! Knallen! Ah, die Symphonie des mexikanischen Unabhängigkeitstag-Feuerwerks, ein akustischer ...
Der blühende Kampf der Blumenzwiebeln: Ein farbenfrohes Rätsel Treten Sie ein, meine Damen und Herren, in...
Die Geheimnisse altehrwürdiger Traditionen entschlüsseln Willkommen, neugierige Seelen und Kulturliebhab...
Entfesseln Sie Ihre innere Fiesta mit verrückten Fotoautomaten-Requisiten! Stellen Sie sich vor: Sie sin...
Lasst die Fiesta beginnen: Eine fotografische Reise durch die Feste der indigenen Völker Mexikos Meine Da...
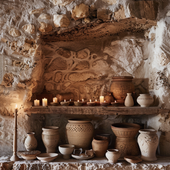
Entfesseln Sie den Koch in sich mit antiken Aromen: Ein Vorgeschmack auf das indigene Mexiko Stellen Sie ...
Die umfassende Palette kultureller Ausdrucksformen Stellen Sie sich vor: Sie blättern durch endlose Seit...
Oh je, schnappen Sie sich Ihren Sombrero und einen Espresso, denn Sie brauchen beide Hände frei, um die wund...
Haben Sie sich schon einmal zu einer Dinnerparty gesetzt, auf den Tisch geblickt und gedacht: „Junge, ich w...
Klar doch! Los geht’s: Der Rhythmus der Tradition: Erkundung des lebendigen musikalischen Erbes Mexikos ...
Meine Damen, Herren und alle, die Fiestas lieben, lehnen Sie sich näher heran, denn wir werden gleich die f...
Schätze ausgraben: Die wunderliche Welt des einheimischen mexikanischen Kunsthandwerks Nehmen Sie sich e...
Meine Damen und Herren, halten Sie Ihre Tacos zurück und machen Sie sich bereit für eine pyrotechnische Rei...
Seien wir ehrlich, Amigos und Amigas – wenn es darum geht, eine Fiesta aufzupeppen, schreit kaum etwas so s...
Wenn der Himmel funkelt: Den Fuego mit einem Kichern und einer Schnalle umarmen Waren Sie schon einmal au...
Der explosive Charme des mexikanischen Nachthimmels Wenn Mexikos bezaubernde Landschaften und pikante ku...
Die Fäden der Zeit entwirren mit Postern der indigenen Bevölkerung Mexikos Warum sollten die alten ägypt...
Willkommen, neugierige Leser, in der wunderbaren Welt des Wohlbefindens, wo alte Weisheit auf modernes Gelä...
Bringen Sie Glanz in die Nacht Stellen Sie sich Folgendes vor: Sie sind zu Hause, die Uhr schlägt die St...
Die Wunderkerzen-Debatte: Warum Indoor-Feuerwerke so was von gestern sind Stellen Sie sich Folgendes vor...
Explodierende Spannung: Warum Ihre Party ein Feuerwerk braucht Stellen Sie sich Folgendes vor: Sie sind ...
Meine Damen, Herren und Pyrotechnik-Fans jeden Alters, kommen Sie her! Haben Sie genug von den immer gleich...
Seien wir ehrlich: Das Einzige, was das schimmernde Feuerwerksspektakel noch übertrifft, ist die Sicherheit...


Einen Kommentar hinterlassen